
Hiking the Quilotoa Loop has definitely been one of the highlights of my trip so far. Beautiful hikes during the days and cozy evenings with great food and good company in the evenings; it doesn't get much better than that. Most people I have talked to in Ecuador seemed to be visiting the Quilotoa lake on a daytrip, but for anyone who has the time and a certain appreciation for hiking I would definitely recommend doing the whole loop. The loop can be done in different ways, so this is a guide to how I ended up doing it. I definitely recommend doing the loop in this direction as you are really saving the best for last. The only reason I can imagine for going the other way is to escape the awfully steep hills you will encounter when having the Quilotoa Lake as you're last stop, but they do make for a great workout and they'll make you feel even more proud of yourself once you've completed the loop.

Day 1 - Quito to Latacunga
I enjoyed a chilled morning in Quito as I had no rush in getting to Latacunga. The town itself is quite uninteresting, but it is the most obvious starting point for anyone doing the loop. The bus from Quito leaves from Terminal Quitumbe, costs 2,35 USD and takes about two hours. Once in Latacunga I made my way through town to Hostal Tiana, which seems to this be the most popular choice for backpackers heading towards Quilotoa. The hostel was nice; it has a great view from the rooftop, comfortable dorms and a basic, but good breakfast. They also offer safe storage of your big bag, as it is best to only bring a daypack on the trail, for 1 USD per night. I was initially planning on doing the trek by myself, as I hadn't met anyone who was doing it at the same time as me. That changed within an hour at Hostal Tiana, and suddenly we were a group of five doing the trek together. I was happy to have company.

Day 2 - Latacunga to Sigchos to Isinlivi
Although we woke up quite early we weren't able to leave the hostel until about 10 am. As the Quilotoa loop is a circuit it can be done in both directions. We had decided to finish the trek at the lake rather than starting with it, as the lake is the most spectacular part of the trek. Therefore we started by taking the bus to Sigchos, and then hike from there to Isinlivi, a 14 km hike that's supposed to take 3 - 4 hours.
At 10.30 we got on the bus. The ride takes 2 hours, but offers pretty decent views, and costs 2,30 USD. The hike from Sigchos was scenic and went downhill for the first part, but ended with a pretty steep hill, taking us to about 3000 meter above sea level. We finished the hike in about 3 hours and then checked into Llullu Llama Hostel, which is probably the most recommended hostel in town. It certainly lived up to its reputation. This was the only hostel we had actually reserved in advance, as it does occasionally fill up. We were therefore able to settle into a cozy dorm and then jump in our swimming suits to relax in the jacuzzi. Usually the "spa" costs about 8 USD, but we were happy to learn that around this time of the year it is free to use. Afterwards we played board games and enjoyed the happy hour with two cocktails for 6 USD and a delicious three course dinner. I thoroughly enjoyed the vegetarian option. Llullu Llama had no wifi, which was actually really nice. Instead we socialised with other travellers until bed time.


Day 3 - Isinlivi to Chugchilan
We woke up just before 8 am to enjoy a deliciously filling family style breakfast at 8 am sharp. The hostel served lots of fruit, cereal and scrambled eggs with bread, which made us ready for the hike we had ahead of us. At 9.20 we left the hostel and started walking towards Chugchilan. The hike of the day was about 12 km and was supposed to take 4-6 hours. Just like the day before the hike started with a descent for the first few kilometres and ended with a steep hill on very uneven ground, which lasted for about 750 meters. The reward for making it to the top was a mirador with amazing views, where we had a quick lunch. At 13.10 we walked into the town of Chugchilan and got ourselves a dorm at the Cloud Forest Hostel for 15 USD per person including dinner and breakfast. The hostel certainly wasn't as nice as Llullu Llama, but still pretty alright. As we had the whole afternoon to spend there we checked out the game room, where there were ping pong and a pool table, before playing card games until dinner. Dinner was alright, although still a let down after last nights amazing meal. We ended the evening with even more card games, before calling it a night.


Day 4 - Chugchilan to Quilotoa
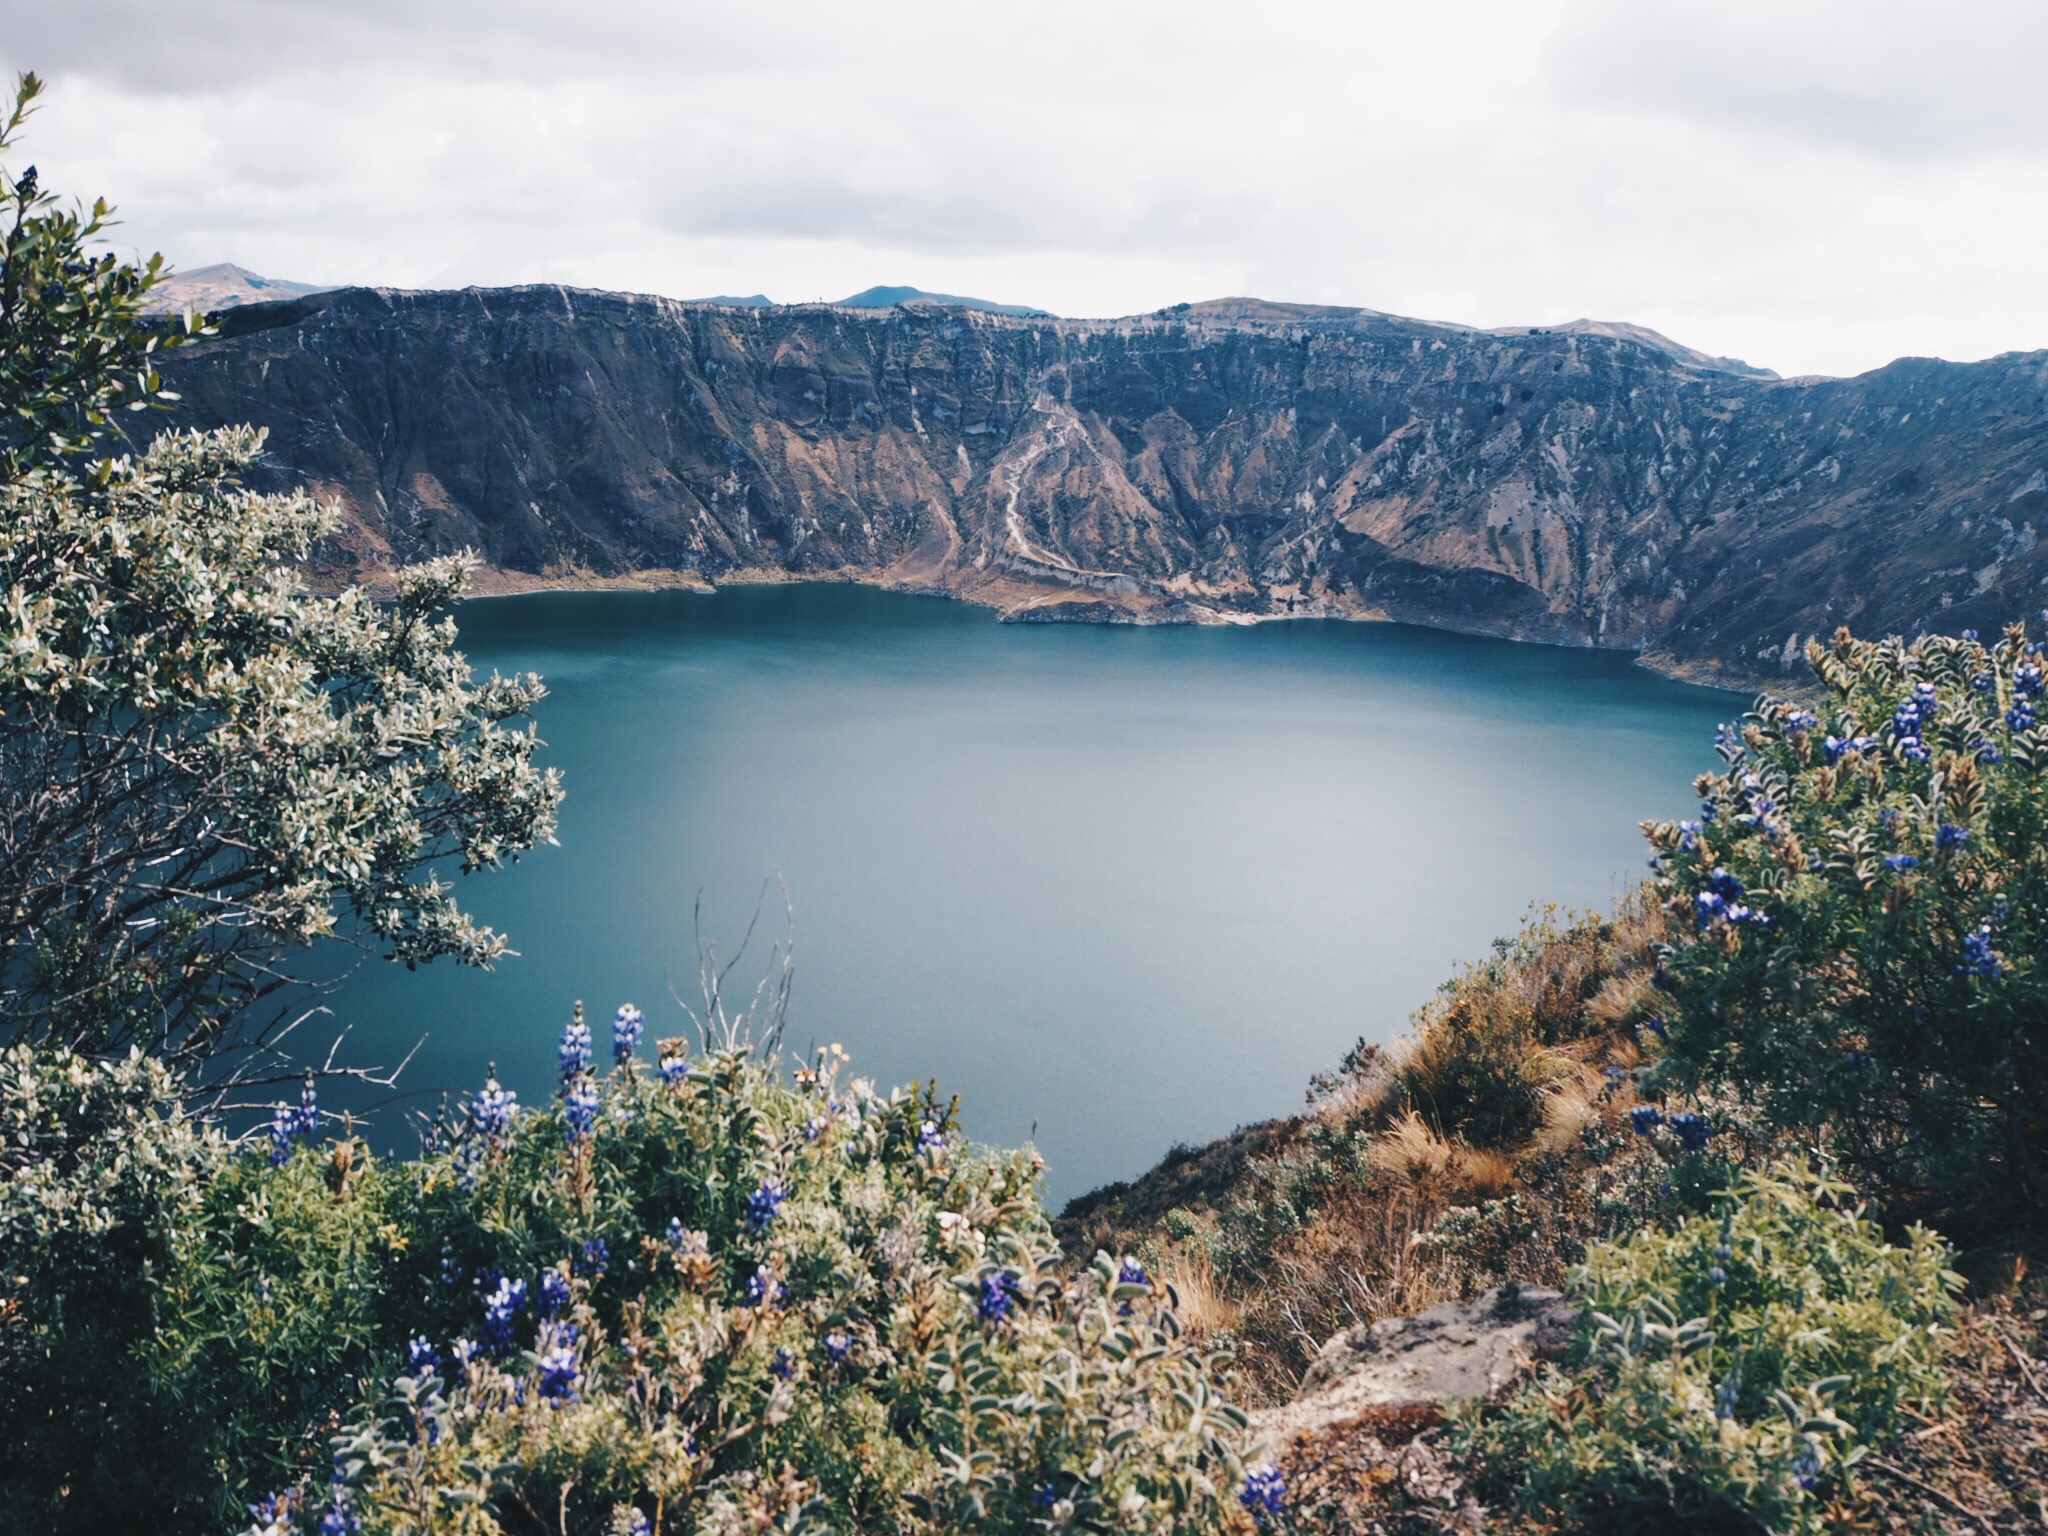
On day 4 our group had grown with two more people so there were seven of us setting out on the last day of the trek at 9.30 am. This part is supposed to be the toughest, but also the most beautiful, and we knew that by the end of the day we would end up at the Quilotoa Lake, which was sufficient as motivation. The trail started downhill for about 2 km, but after that it was all uphill, on some sandy and challenging paths. Luckily we were surrounded by beautiful nature and the occasional cute kid or animal, which made it all worth it. At 14.00 we finally reached the crater of the lake and it was beautifully placed in a valley with mountains all around it. Upon reaching the crater you can choose to do a long or a short hike around the lake and into the city of Quilotoa. The long way takes 3-4 hours, but allows you to reach the highest point in the crater at 3930 meters above sea level, while the short way takes about an hour. Our group decided to split up, and I joined three of the others in taking the long hike. When you've already been hiking for 4,5 hours you'd want to add another 4 hours to that amount, right? To be fair the last part was amazing and probably my favourite part of the entire trek, so it was definitely worth it, but I could also feel my body aching as we reached the hostel. In Quilotoa we stayed at Chukirawa Hostel, where we paid 16,88 USD each for a seven person dorm with dinner and breakfast included. The hostel was freezing, but otherwise alright. It was a good feeling going to bed that night, knowing that I'd accomplished a trek of about 46 km in about 15 hours over three days.


Day 5 - Quilotoa to Latacunga
It was quite a nice feeling waking up on the fifth day, knowing that I didn't have to rush off to anywhere. We enjoyed a long breakfast and then decided to take a closer look at the lake. The village of Quilotoa is located on top of the crater rim, so it took about 20 minutes of steep downhill walking to get down there. Down by the lake we rented kayaks for 3 USD per 30 minutes, which was an enjoyable experience. After relaxing on the dock for a while we started the much less enjoyable uphill hike. Steep, sandy hills are definitely not a favourite of mine. At 3 pm we caught the bus back to Latacunga for 2 USD. With that we were back to where we started and had officially completed the circuit. While most of us had vague plans of making it to our next destinations that afternoon, we all ended up staying in Latacunga for one more night. It was quite nice ending a chilled day with an equally chilled evening before setting off on new adventures.


Is it expensive to trek the Quilotoa Loop?
No. It really isn't. I've seen quite aggressively priced guided tours of the loop, but I honestly don't understand why a guided tour would be necessary. The hostels provide good directions, so finding the way around isn't difficult. We paid between 15 and 19 USD per night per person in a shared dorm, but this included both a three course dinner and a decent breakfast. Lunch boxes were available for purchase. I only got the one at Cloud Forest Hostel for 3 USD, and it was well worth the money.
In total I ended up spending 92,50 USD (726 NOK) over five days. This includes all meals, snacks, water refills, celebratory drinks, hostel beds, bus rides and so on that I've had, from the moment I got on the bus to Latacunga on day 1 until I returned five days later. With an average of 18,50 USD per day this will probably stand out as one of the cheapest highlights of my trip.
Other notes about the trek:
I think every blog I've read about the Quilotoa Loop points out how important it is to bring warm clothes, so I did that. My experience after hiking the loop in the middle of September is that it is in fact quite warm. I've been wearing t-shirt and tights for hiking, but could easily have worn shorts if I had brought some. A long sleeved shirt and sweat pants have been sufficient for the evenings, while gloves and head band have not once left my backpack. A wind proof jacket ended up being nice when we finally reached the lake, as it was quite windy around there. I did however expect the temperatures to be at the same level as Cotopaxi, but they really aren't. I guess you never really know what the temperatures will be like, but would still point out that it won't necessarily be cold.
Also, pack as lightly as you can. I brought my 18L daypack and was happy about the choice. Wearing the same trekking outfit five days in a row is just a part of the experience, right? Hiking boots that provides a good grip will definitely be an advantage, but I've also witnessed first hand that the trek can be completed in flip flops, although I don't think I would recommend it.

--